Once you've learned some of the more basic HTML techniques (see the links section of this page for past HTML tutorials), you're ready to tackle one of the most important elements in Web page design: tables.
In their most basic form, tables look like simple grids or spreadsheets displaying information in orderly rows and columns. But many people use tables to control the layout of text and graphics on their Web pages. With tables, you can often design compelling page layouts that would be difficult or impossible to achieve otherwise.
This intermediate-level tutorial will explain enough about tables to get you going. In the next issue of bLink, we'll delve into more advanced page-layout techniques using tables.
The Basics
Tables use four basic elements. All begin with <TABLE> and end with <TABLE>. Next, every table must have at least one table row, created by the <TR> tag. And each row must have at least one table data cell, created by the <TD> tag. Finally, the BORDER attribute, used within the <TABLE> tag, sets the thickness of your table's border (if you don't want a border, you should specify BORDER=0).
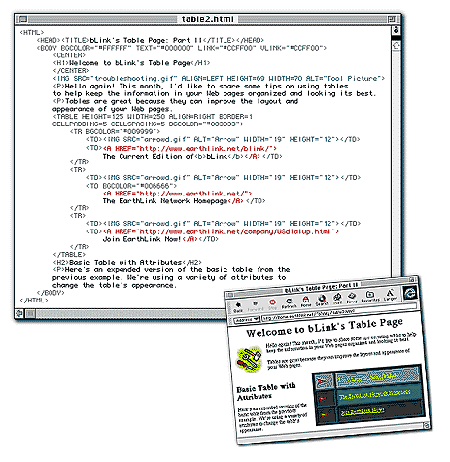
Let's suppose EarthLink's faithful mascot bLink wants to use a table to list his favorite links with an arrow-shaped bullet next to each link as a design element. This can be done without a table, but a table offers greater control over the look and position of the hotlist.
The HTML in the example creates a table with three rows, each row containing two data cells. The table begins with <TABLE> and ends with </TABLE>. The BORDER=4 attribute sets the table border to four pixels. (Experiment by making the border value higher or lower, and see how the border thickness changes. And then try eliminating the border by using BORDER=0.)
If the HTML code between the <TABLE> and <TABLE> tags looks confusing, don't panic. Each set of <TR> and <TR^> tags creates one new row in your table. Our three sets of these create three table rows. In each row, sets of <TD> and <TD> tags determine what appears in the table data cells. You can have as many rows and cells as you want in your tables; all you have to do is use a new set of <TR> tags for each new row and a new set of <TD> tags for each new cell.
What you put between each set of <TD> and </TD> tags is what people will see when they view your table. This can be plain text, links, images, or background color. And you can format the text and images with the familiar HTML tags for bold or italic text, line breaks, ordered and unordered lists, image borders, and so on.
Customizing Your Tables
You've learned the basics already — but don't stop there! With just a few more tricks, you can change and control how your tables look and give yourself many more page-design options. All you need to know are a few new attributes to use with the basic tags you've already learned:
WIDTH and HEIGHT: When used within the <TABLE> tag, these attributes define the dimensions, in pixels, of your table.
ALIGN: Use this attribute within the <TABLE> tag to position your table (either LEFT or RIGHT) on the page. ALIGN works the same way it does when it's used with the <IMG> tag; it allows you to position the table and have text flow around it.
CELLPADDING: Used with the <TABLE> tag, this sets the space, in pixels, between a cell's "wall" and its contents.
CELLSPACING: Also used within the <TABLE> tag, this attribute changes the space, in pixels, between a table's cells (i.e., it sets the thickness of the table's "inside borders").
BGCOLOR: Use this attribute within the <TABLE> tag to change the background color of the whole table, or use it within the <TR> or <TD> tags to change the color of a single row or cell, respectively.

Figure 1 shows how to use these elements. We made the table background color a dark teal by putting BGCOLOR="#003333" inside the opening <TABLE> tag. Next, we put the attribute BGCOLOR="#009999" in the table's first <TR> tag to change the table's first row to a light shade of teal. Finally, we changed the background color of a single cell to a mid-range teal by placing the attribute BGCOLOR="#006666" in the <TD> tag. Note the flexibility you have in coloring all or part of your table.
Figure 1 shows how you can increase space between table cells. We achieved this effect by using the CELLSPACING=5 attribute. If you don't want any space between your cells, set this attribute to 0. To increase the space between the cell contents (the links and images) and their surrounding cell "walls," we used the CELLPADDING=5 attribute within the <TABLE> tag.
Some text in Figure 1 flows to the left of the table because we used the ALIGN=RIGHT attribute in the <TABLE> tag. This shifts the table to the right side of the page and causes any text that follows to wrap to the left.
We also defined the dimensions for the table with the HEIGHT=125 and WIDTH=250 attributes inside the <TABLE> tag. It's a good idea to set the height and width if you want to maintain the exact dimensions of your table. If you leave these dimensions out, the browser will size your table to fit the cell contents, perhaps resulting in a smaller table than you want. Also, be sure not to set the height and width too small for the contents you want to fit inside.
You now have the skills to build simple tables to organize much of the information on your Web pages.