Figure 1
Frames are a powerful HTML feature that automatically splits the browser window of anyone who visits your site, allowing you to display two or more Web pages at once.
Often, Web builders use frames to facilitate site navigation. In the most common layout, a small frame at the top or side of the browser window holds a hyperlinked table of contents. Clicking these links displays the rest of your site's pages in a large, main frame. This layout keeps your site's linked table of contents visible at all times.
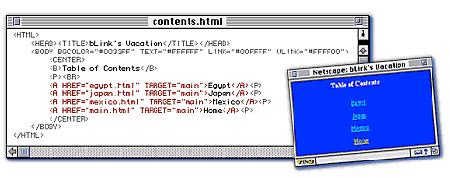
This tutorial, which covers how to create one of these two-frame sites, assumes a basic knowledge of HTML. To catch up or refresh your memory of HTML, read our beginner tutorials. The site we'll use as an example, shown in Figure 1, chronicles the recent world vacation of the EarthLink mascot, bLink.

Figure 1
Creating the Frameset
In Figure 1 (above), the left frame holds the table of contents, the hyperlinked list of countries bLink visited. The second frame initially serves as the site's welcome page; other pages will load in this frame and replace the welcome when the links in the contents frame are clicked.
A framed Web site always consists of a "parent" HTML document containing a frameset that defines the size and placement of the frames, as well as several "child" HTML documents to fill those frames.

Figure 2
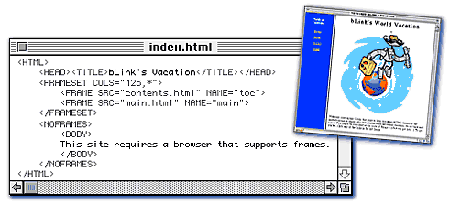
Figure 2 (above) shows the HTML for our parent document, our site's homepage, which we name index.html. In its basic structure, it looks much like any other HTML document. One major difference, however, is the use of the <FRAMESET> tag in place of the standard <BODY> tag.
You use this <FRAMESET> tag to define whether you want your page to be split into columns (vertically) or rows (horizontally). In Figure 2, the COLS attribute within the <FRAMESET> tag creates our column layout. (Had we wanted rows, we would have used the ROWS attribute instead.)
Frame Sizes
You need to assign values to the COLS attribute to control the size of the frames. Values can be pixel widths, percentages, or relative size. In our example, we use the value "125,*". The number 125 is the pixel width of the left frame. The asterisk (*) is a relative size indicator, which means that this frame will take up however much space is left over beyond the 125 pixels. If our example had three frames, we would use three comma-separated values, and so on.
If you want your frames to occupy a certain percentage of the browser window, you can specify the percentages you want, like this: <FRAMESET COLS="20%,80%">. In this case, the first frame will be 20 percent of the total window width and the second frame will use the remaining 80 percent. (Use this approach only if fixed frame widths aren't important to your layout.)
However you size your frames, remember that you can't control the browser window sizes of visitors to your site. So consider how your framed pages will look in different browser window sizes. Experiment with your own pages and test them with various browser widths.
Filling Your Frames
Look back at Figure 2. Notice that we use two <FRAME> tags between the <FRAMESET> and </FRAMESET> tags. You will always need one <FRAME> tag with an SRC attribute for each frame on your site to specify what Web document appears in the frame. (The SRC attributes have document names as values.) Our first frame contains the table of contents, named contents.html. The second frame contains our welcome page, main.html.
Another attribute used inside the <FRAME> tag is NAME, which gives each frame a unique ID. Frame names will be important later on, when we create our table of contents. You can use any names you want, as long as each frame has a unique name. (There are other attributes you can use with the <FRAME> tag to control margin, border, scrolling, and other frame characteristics. For help, you can consult the online frames tutorials we've listed to the left of this article after you're comfortable with the basics.)
Pages to Frame
Our parent document is now complete, but it's only a skeleton — the frames are still empty. So, let's fill them with HTML pages.
Figure 1 shows contents.html, our table-of-contents page. Most of the HTML should be familiar to you, but pay special attention to the TARGET attributes within the <A> tags. TARGET indicates the frame in which the browser will display the new page when a link is clicked. We use TARGET="main" for all the links because we want all the pages to load in the "main" frame specified earlier in our parent document.

Figure 3
There are a few special, universal TARGET values. One, TARGET="_top" (note the underscore character before the word "top"), makes the new page load in a full browser window rather than in a frame. This is useful when you're linking to other people's Web sites; without it, other sites will appear in your frames.

Figure 4
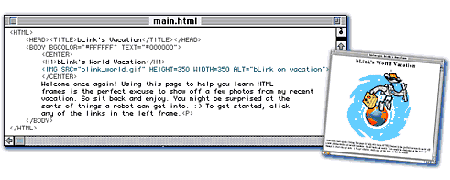
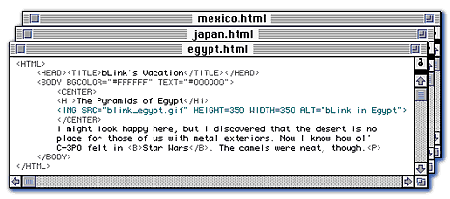
All the other pages on our site, shown in Figure 4 (mexico.html, egypt.html, and japan.html), look similar to our welcome page, main.html, shown in Figure 3 — simple pages composed of text and images. These other pages will replace main.html in the main frame when the table-of-contents links are clicked.
When you create a framed Web site, give out the URL for the homepage (the parent document, index.html). When visitors arrive, their browsers will automatically find the other documents specified in your parent document page and fill all the frames you've created.
What to Do When You're Framed -- Tricks for getting what you want out of a framed Web site
Web sites using frames present a few navigation and printing issues. Web authors and surfers alike should keep these tips in mind:
Printing Frames
Bookmarking
In Macintosh versions of Netscape, hold down your mouse button in the frame you want to bookmark. In the menu that appears, select New Window with This Frame, and bookmark the new page.
Using the Mac version of Internet Explorer, locate the link for the page you want to bookmark. Click the link and hold down the mouse button. Select Add Link to Favorites from the pop-up menu.
Windows users just need to right-click inside the frame and select either Add Bookmark or Add to Favorites (the menu choice available depends on which browser you use).
Resize Frames
Refresh or Reload a Frame
View a Frame's Source Code
Using the Back and Forward Buttons
Most browsers will not let you print a framed site the way it appears on your screen; instead, you can only print one frame at a time. To do this, first click within the frame to select it. Then choose Print or Print Frame from your browser's File menu. (Internet Explorer 4.0 for Windows 95 gives you more options. You can print one frame, each frame individually, or all the frames as they appear on your screen.)
As you click from page to page within a framed site, the URL in your browser's location bar often does not change. This presents a problem if you want to bookmark a specific framed page.
Some Web sites allow you to change the size of the frames so you can get a better view of the pages. To find out if you can, move your mouse pointer over a frame border. If the pointer turns into a bi-directional arrow, click and hold your mouse button and drag the frame border to a new position.
Don't hit the Reload button on your browser if you want to refresh a single frame; your browser will reload all the frames. Save some time by moving your mouse pointer to the frame. Hold down your mouse button (Macintosh) or right-click (Windows). In the menu that appears, you should see an option to Refresh or Reload the frame. This feature is available only in Netscape 4.0 and Internet Explorer 3.0 and later.
Web authors often view the source of a page to see how it was put together. You can view the HTML for an individual frame. Click and hold the mouse button (Macintosh) or right-click (Windows) on the frame you want to view. From the pop-up menu, select View Source or View Frame Source. Note that this feature is not available in Mac versions of Netscape or Windows versions of Netscape prior to version 4.0.
These buttons on your browser's toolbar will take you to previous pages you have visited within a framed site. This may sound simple enough but any one who uses Netscape Navigator 2.0 knows that clicking the Back and Forward buttons in that browser takes you out of the site entirely, bringing you to the previous Web site you visited.