Once you've decided to publish your own homepage on the Web, you may want to obtain an authoring program. But if you're the kind of person who likes to do things by hand, you'll find that HTML isn't that hard to master. HTML (hypertext markup language) is used to "markup" a document so that it can be read in the "hyperlinked" Web environment. HTML commands — called "tags" — tell browsers if a line of text is plain or boldfaced, designate the way paragraphs are formatted, and allow images and hyperlinks to be placed on a page.
HTML tags follow a specific and consistent format. First, all commands are placed between "caret" symbols: "<" and ">". For example, the HTML tag to begin bold text is <b>. Next, almost all commands are grouped in pairs; one to begin the action, one to end it. The tag used to end the action is identical to the beginning tag, except that the ending tag begins with a slash "/". To continue our earlier example, the tag to end text-bolding is </b>, so the full sequence of tags needed to bold the word "Hello" is <b>Hello</b>.

The Basic Web Page
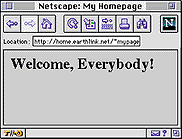
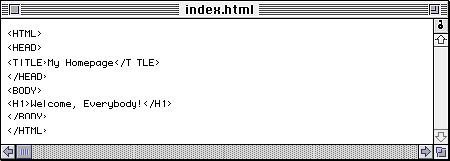
There are some tags that must be used for every Web page. Take a look at the HTML tags that produced the simple page shown in Figure A. First, each page must begin with the command <HTML> and end with the complementary tag </HTML>. These tags tell a browser that your page is intended for the Web.
Next, the HTML for every Web page is divided into two sections. The first section, the "head" — everything between the <HEAD> and </HEAD> tags — contains information about the document, including a "title" which will run at the top of the browser window. The second section is referred to as the "body." The body contains all the information that will appear on the page itself. It includes everything between the <BODY> and </BODY> tags.
Now take a closer look at the body section of the HTML; notice that the text that will appear in the browser window is framed by the tags <H1> and <H1>. These "header" tags allow you to change the size of important text on your page. There are six sizes possible, from <H1> to <H6>, with <H1> being the largest.
Formatting and Font Size
Examine the HTML for the Web page in Figure B. Building upon the first very basic page, this expanded version contains four new tags. Notice how everything in the Figure B Web page is centered in the browser window. This is done with the <CENTER> and </CENTER> tags that enclose the information in the body of the Web page.
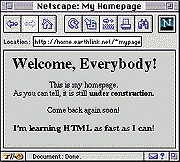
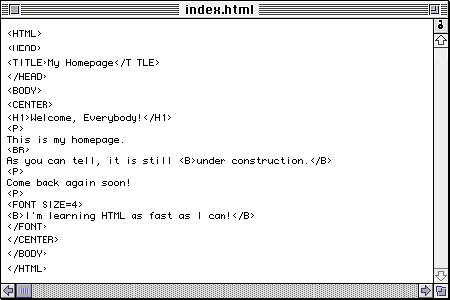
Next, find a <P> tag. This tag adds a line space, creating a new paragraph. The <BR> command, on the other hand, breaks a line WITHOUT creating a new paragraph. Note: The <P> and <BR> tags, unlike most other tags, do NOT require ending tags.
The <FONT SIZE=x> tag (and the </FONT> closing tag) is the next tag you should examine. This tag allows us to alter the size of text on our page. (Just replace x with a number between 1 and 7. 1 produces the smallest text and 7 the largest. The default setting — the size your text will be if no font-size tags are used — is equal to 3.)
Adding Images and Web/Email Links
Want to place an image on your Web page — perhaps a GIF or JPEG file downloaded from the Internet? How about creating hyperlinks to some of your favorite sites?
Take a look at our last HTML example and its corresponding Web page in Figure C. An image has been added to the Figure C Web page by using the <IMG SRC="your.image"> command.
The image file in our example is named picture.GIF, so we've written <IMG SRC="picture.GIF"> in our HTML. There is no complementary "close" command required for the <IMG> tag. To change the location of an image on a Web page, add ALIGN=LEFT (or RIGHT, MIDDLE, TOP, or BOTTOM) to this command. Note: In order to use an image on a Web page, it should be uploaded to the same directory of your Web site in which your index.html file is stored. Also, although HTML commands are not case-sensitive, file names are, so make sure you transcribe the exact name of your image file into your HTML script.
Next, scan the HTML example, and find the following tag: <A HREF="http://www.earthlink.net/blink/">bLink</A>.
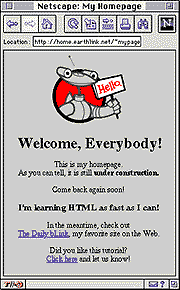
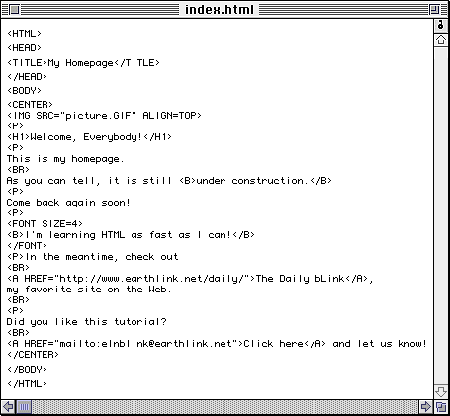
This tag creates an underlined hyperlink that, when clicked, takes the viewer right to the Web page listed within the tag — in our example, we've created a hyperlink to bLink. A hyperlink can also be created for a email address. As shown in our example, <A HREF="mailto:elnblink@earthlink.net">Click here and let us know!</A> makes a link that, when clicked, will allow the visitor to write an email message to the designated address.
Making, Saving, and Viewing Your Page
Now that you know some of the tags, any text editor (for example, SimpleText for Macs, or Notepad for PCs) or word-processing software can be used to create your own HTML document. When saving your work, just remember that the file name for every HTML page must end with the suffix .html or .htm. (.htm has to be employed by PC users who can't create file names with suffixes more than three digits long.) The file name for your homepage should be index.html or index.htm. Other Web pages stored in the same directory can be named anything you want, as long as they employ the .html or .htm suffix. Once your HTML file is complete, all you have to do is upload it and any necessary image files to your webspace. However, it is not necessary to upload your HTML file first in order to see what it will look like. Just drag and drop your saved HTML file icon into the browser's window, and the Web page will display automatically.
The examples in this tutorial reveal just a few of the many things you can do with HTML.